Auto-Tuning and Programming a Yaskawa Drive when Using a Permanent Magnet (PM) Motor
Topic Description

A permanent magnet (PM) motor is constructed with magnets in or around the rotor and requires a VFD to accelerate up to full speed or run at a specific RPM. Some of the advantages with this type of motor include high efficiency, light weight, and excellent torque control. There are certain Yaskawa Series drives which have the capability to run a permanent magnet (PM) motor. It is crucial the drive is setup correctly and an Auto-Tune performed to maximize performance and prevent damage to the motor compoents. For more information on permanent magnet motor control in general, refer to the following documents:


Resolution

To Auto-Tune and program a Yaskawa Series drive for a permanent magnet (PM) motor, follow the steps below:

  1. Obtain any available motor data such as a datasheet, test report, or the nameplate on the motor itself.

     
  2. Set or verify the Control Method being used in parameter A1-02. Set as required for the application. Refer to document: Control Features for Permanent Magnet (PM) Motor Operation
    • 5: PM Open Loop Vector - Use this mode for general, variable-speed applications with low demands on dynamic response or speed accuracy. The drive can control an SPM or IPM motor with a speed range of 1:20 in this control mode.
    • 6: PM Advanced Open Loop Vector - Use this mode for general, variable speed applications that require precise speed control and torque limit. Set High Frequency Injection parameter n8-57 to 1 to achieve a speed control range as high as 1:100.
    • 7: PM Closed Loop Vector - Use this mode for high-precision control of a PM motor in constant torque or variable torque applications. The speed control range reaches 1:1500. A speed feedback signal is required.
      • Note: The encoder must be wired and properly configured. Enter the appropriate encoder information and verify the encoder rotation direction is correct before proceeding with CLV Auto-Tune.
         
  3. Determine the type of Auto-Tuning needed based on the Control Method and drive model being used.
      A1000 V1000 <2> U1000 Z1000 Z1000U L1000 U1000L GA500 GA800 HV600 FP605
    Control Methods
    Available
    A1-02 = 
    5: PM Open Loop Vector X X X X X     X X X X
    6: PM Advanced Open Loop Vector X   X         X X    
    7: PM Closed Loop Vector X   X     X X   X    
    8: EZ Vector Control               X X X X
    Types of
    Auto-Tuning
    T2-01 = 
    0: PM Motor Parameter Settings X   X X X   X X X X X
    1: PM Stationary Auto-Tune X   X   X X X X X X X
    2: PM Stationary Auto-Tune for Stator Resistance X   X   X X X X X X X
    3: Z Pulse Offset Tuning X   X           X    
    4: Rotational (Ld, Lq, R, back-EMF)               X X X X
    5: High Frequency Injection               X X X X
    8: Inertia Tuning <1> X   X                
    9: ASR Gain Tuning <1> X   X                
    11: Back EMF Constant  X   X     X X        
    12: PG-E3 Encoder Characteristics           X X        
    13: High Frequency Injection Parameter Tuning X   X       X        
    14: PM Rotational Auto Tuning <3> X   X   X   X        
    <1> Both Inertia Tuning and ASR Gain Tuning are not necessary for startup and can be performed to optimize settings for the ASR gain, KEB Ride-Thru (KEB 2), and Feed Forward functions. 
    <2> V1000 drives do not have an Auto-Tune function. See below to manually set the E5-xx (PM motor) parameters.
    <3> When performing a PM Rotational Auto-Tune, it's best to have the load uncoupled from the motor. If this is not possible, reduce the load so it is less than 30% of the rated load.

     
    If necessary, refer to the table below for more detail on the type of Auto-Tuning for a PM motor.
    Type Auto-Tuning Type Setting Application Conditions and Benefits Control Mode
    A1-02 = 5
    OLV/PM
    A1-02 = 6
    AOLV/PM
    A1-02 = 7
    CLV/PM
    PM Motor Parameter Settings T2-01 = 0 • Motor does not rotate during Auto-Tuning.
    • Motor data similar to Table 4.18 are available from test report or motor nameplate.
    x x x
    PM Stationary Auto-Tune T2-01 = 1 • A motor test report listing motor data is not available.
    • Drive automatically calculates and sets motor parameters.
    x x x
    PM Stationary Auto-Tune for Stator Resistance T2-01 = 2 • Useful to tune the drive when the motor data were set up manually or by motor code and the cable is longer than 50m.
    • Should also be performed if the cable length has changed after prior tuning.
    x x x
    Z Pulse Offset Tuning T2-01 = 3 • PG encoder has been replaced. Calculates the Z Pulse offset.
    • Requires the motor to rotate with no load or very low load.
        x
    Back EMF Constant  T2-01 = 11 • Use when a motor test is not available.
    • Tunes the motor induction voltage only.
    • Should be performed after motor data are set and the encoder offset is adjusted.
    • The motor must be uncoupled from the mechanical system (remove loads).
        x
    PG-E3 Encoder Characteristics T2-01 = 12 • Perform this Auto-Tuning to obtain accurate position data from the motor rotor for driving a PM motor.
    •  This is only available in L1000 drives with firmware 1102 or later when using a PG-E3 option card.
        x
    High Frequency Injection Parameter Tuning T2-01 = 13 • The motor rotated in reverse or STo fault (Motor Step-Out) occurred at startup in OLV/PM.
    • Low speed and insufficient or no torque after activating the high frequency injection control (n8-57 = 1) in AOLV/PM.
    • Faults, such as the motor rotating in reverse, occurred when the power was turned on during initial startup in CLV/PM.
      x x
    PM Rotational Auto Tuning T2-01 = 14 • A motor test report listing motor data is not available.
    • Motor can be decoupled from the load and rotate freely while Auto-Tuning is performed. Drive automatically calculates and sets motor parameters.
    • PM Rotational Auto-Tuning gives more accurate results than Stationary Auto-Tuning.
    x x x
     
  4. To start the actual Auto-Tune process, first navigate to the Auto-Tuning menu and press ENTER.

     
  5. Press ENTER on the keypad to select the type of Auto-Tuning in parameter T2-01. Use the UP/DOWN arrows to select a different type if necessary and press ENTER again to save the new value.

     
  6. Press the UP arrow to navigate to the next T2-xx parameter setting. If necessary, press ENTER to change the value of the T2-xx setting and press ENTER again to save the new value.

     
  7. Enter all T2-xx parameter settings necessary for the type of Auto-Tune selected in T2-01. Use the table below to see which T2-xx settings need to be changed.
    Input Value Input
    Parameter
    Tuning Type (T2-01)
    0: Motor
    Parameter Settings
    1: Stationary 2: Stationary
    Stator Resistance
    3: Z-Pulse
    Offset
    11: Back EMF
    Constant
    13: High Frequency
    Injection
    14: Rotational
    Control Mode A1-02 5 6 7 5 6 7 5, 6, 7 7 7 6, 7 5 6 7
    Motor Code (Hex) T2-02 X <1> X <1> X <1> - - - - - - - - - -
    Motor Type T2-03 - - - X X X - - - - X X X
    Motor Rated Power (kW) T2-04 X X X X X X - - - - X X X
    Motor Rated Voltage (Vac) T2-05 X X X X X X - - - - X X X
    Motor Rated Current (A) T2-06 X X X X X X X - - - X X X
    Motor Rated Frequency (Hz) T2-07 - X - X - - - - - - X - -
    Number of Motor Poles T2-08 X X X X X X - - - - X X X
    Motor Rated Speed (RPM) T2-09 - X X - X X - - - - - X X
    Stator Single-Phase Resistance (ohms) T2-10 X X X - - - - - - - - - -
    d-Axis Inductance (mH) T2-11 X X X - - - - - - - - - -
    q-Axis Inductance (mH) T2-12 X X X - - - - - - - - - -
    Induced Voltage Constant Unit Selection T2-13 X X X - - - - - - - - - -
    Motor Induced Voltage Constant (Ke) <2> T2-14 X X X - - - - - - - - - -
    Tuning Pull-in Current T2-15 - - - X X X - - - - X X X
    PG Number of Pulses Per Revolution (ppr) T2-16 - - X - - X - - - - - - X
    Z Pulse Offset T2-17 - - X - - X - - - - - - -
    <1> Input the Yaskawa motor code. Set to "FFFF" when using a motor from another manufacturer.
    <2> This setting is also known as the Back EMF and may be shown as mV (rad/s) or mV (r/min) on the motor nameplate.

     
  8. When finished entering all the T2-xx settings, press the RUN key to start the tuning process (if applicable). The display will show "END - Tune Successful" when finished.

     
  9. If applicable, perform any other additional Auto-Tune while operating in CLV (A1-02 = 7) such as a Z Pulse OffsetBack EMF Constant, and/or High Frequency Injection Parameter Tuning.

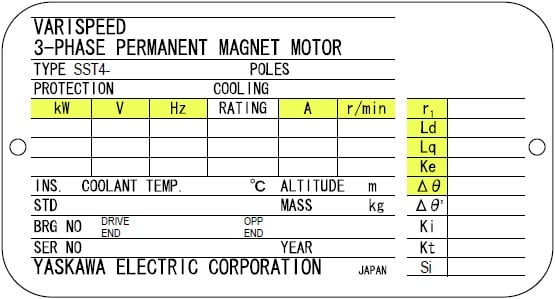
V1000 Drives

Since V1000 drives do not have an Auto-Tune function, the E5-xx parameters will manually have to be entered. Set or verify the following:

  • A1-02 = 5 (Control Method set for PM Open Loop Vector)
  • E1-04 = Maximum Frequency (Hz)
  • E1-05 = Motor Rated Voltage (Vac)
  • E1-06 = Motor Base Frequency (Hz)
    • Note: This value may be the same as the Maximum Frequency set in E1-04.
  • E5-01 = FFFF (Custom motor data for non-Yaskawa PM motor)
  • E5-02 = PM Motor Rated Power (kw)
  • E5-03 = PM Motor Rated Current (FLA)
  • E5-04 = PM Motor Pole Count
  • E5-05 = PM Motor Resistance (ohms/phase)
  • E5-06 = PM d-axis Inductance (mH/phase)
  • E5-07 = PM q-axis Inductance (mH/phase)
  • E5-09 = PM Back-EMF Vpeak (mV/(rad/s))
    • Note: Set this parameter when you use an IPM motor with derated torque or an IPM motor with constant torque.
    • When setting E5-09 to a non-zero value, parameter E5-24 must be set to "0.00".
  • E5-24 = PM Back-EMF L-L Vrms (mV/rpm)
    • Note: Set this parameter when you use an SPM motor.
    • When setting E5-24 to a non-zero value, parameter E5-09 must be set to "0.00".

Related Documents
Auto-Tuning Parameter Settings and Performing an Auto-Tune (with video)
Cannot Access or Change E5 Parameters
Control Features for Permanent Magnet (PM) Motor Operation
Parameters to Use when Handling a Baldor Reliance EC-Titanium Motor
Parameters to Use when Handling a Baldor Reliance PM Motor R32-A000-0310
Parameters to Use when Handling a Baumuller PM Motor DST2-260LO54W-030-5
Saving Auto-Tune Settings
Troubleshoot Pull-out Detection (STo) Fault on the A1000, V1000, Z1000 OR STPo on GA500, GA800, HV600 and FP605

Product Types
FP605, FP605 Configured, GA800, GA800 Configured, GA500, HV600, HV600 Configured, A1000, A1000 Configured, L1000, U1000 Industrial, U1000 Industrial Configured, U1000L, U1000 Oil and Gas, V1000, V1000-4X, Z1000, Z1000 Configured, Z1000U, Z1000U Configured,
All Applications
Advanced Random Rotary Knife with Cam Blend, Air Compressor, Blister pack Thermoformer, Cartoner, Centrifuge, Conveyor, Crane/Hoist, Dynamometer, Elevators and Escalators, Extrusion, Fans/Blowers, Feed To Length, General Machinery, HVAC, Irrigation, Labeler, Laundry, Linear Flying Shear, Machine Tool, Mixer, Other, Packaging, Palletizer, Precision Grinding, Pump, Punch Press, Rotary Knife, Rotary Placer, Rotary Table Indexer, Screw Feeder, Semiconductor, Solar Cell Tabbing and Bussing, Solar - Textured Etching, Synch-Belt, Textile, Winding,
Last Modified Date: 02-10-2025ID: 10766